


Fall Plumbing Tips

When it comes to your home’s plumbing system the maintenance you perform in the fall is probably the most important maintenance you’ll do all year. As the temperature begins to drop and the leaves start to change it’s important to check your home’s pipes, faucets and gutters to ensure everything is in good repair. To avoid potentially costly damage in the winter months, review the following checklist before the snow and ice take over.
- Check all outdoor faucets for drips or leaks. If you find any be sure to address them, or contact All Star Plumbing and Restoration to come out and take a look.
- Turn outdoor faucets completely off and shut off the interior valve, typically located in the basement, to prevent freezing.
- Disconnect all outdoor water hoses. Water left inside a hose that’s connected to your house could freeze and damage both the hose and the faucet.
- Inspect hose bib and cover with Styrofoam to provide additional protection if not a frost free unit.
- Inspect all of your home’s plumbing pipes and make sure they are properly insulated. Don’t forget to check pipes in the garage and basement areas as they are the most susceptible to freezing.
- Clean your gutters out. Make sure that melting snow has an easy route away from your home.
- Test your sump pump. Dump a bucket of water on your sump pump and make sure it turns on and pumps the water out. You certainly don’t want to find out your sump pump isn’t working when it’s already full of water. If it’s not working properly, or has a foul odor, contact All Star Plumbing and Restoration to get it addressed.
- Drain your water heater. You’ll find that you go through more hot water in the winter months so to make sure your water heater is operating efficiently you’ll want to drain it once a year and reduce sediment build-up. Use caution when connecting a hose to the drain valve as the water is certainly very hot. Run the hose to a floor drain nearby.
While this list may sound intimidating, it’s really just a Saturday afternoon’s worth of work. With no BSU football season this year it’s the perfect time to knock this list out. We find the checklist to be incredibly helpful in making sure something small, like forgetting to disconnect the hose, doesn’t lead to something expensive like a burst pipe in your basement. Go through this seasonal checklist and you’ll be good for another year of smooth sailing.
Shoo Fly!
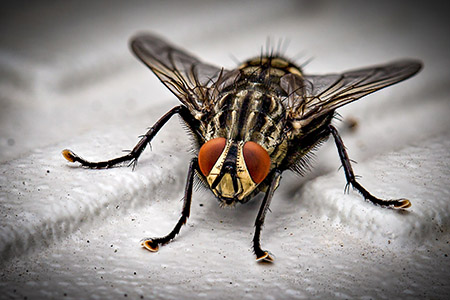
Fruit flies, sometimes called drain flies, in your bathroom can be a major nuisance, but there are some simple things you can do to get rid of them. Fruit flies are drawn to the bathroom, even if there’s nothing sweet in there, simply because they like warm, moist spaces such as the bathroom. They can also be attracted to things in your sink or shower drain. If you see them around the drain look closely, you may be confusing them with sewer gnats which have a similar appearance. The good news is that these pesky visitors are largely harmless, just annoying. In rare cases they can carry bacteria from rotting foods and contaminate other foods, but otherwise are just gross.
You can go nuclear with insecticides and household cleaners, but there are several natural options as well. This may seem obvious but start by addressing the source of your problem – the drain. Clean the drains in the bathroom thoroughly. Try one of these two options: pour ½ c. baking soda, ½ c. salt and 1 c vinegar down the drain and allow it to sit overnight before pouring boiling water down the rinse OR pour ½ gal. of water and 1 c. of bleach or vinegar down. Either option will clean and sanitize the drain.
Now let’s get rid of the actual flies. You need to create essentially a fly trap. One great option is to put some ripe fruit in a cup and cover it with plastic wrap. Poke some holes in the plastic which will allow the flies to get in but make it difficult for them to get out. A fork will create the right size holes for the job. Another choice, or something to do in addition, is to mix 5 drops of dish soap with 1 1/2c. apple cider vinegar and place it near the drain. You can warm it for a few seconds in the microwave to increase your fly appeal.
On the off chance that this doesn’t take care of your problem, give All Star Plumbing and Restoration a call. It’s possible that there’s a problem with your p-trap or drain line. The p-trap, U-shaped pipe under every bathroom or kitchen sink, should contain water in a self-sealing trap. If there’s a crack or other issue it’s possible that flies are your indicator of a problem. We can come in and determine the source of the problem if the traditional fruit fly removal methods aren’t working.
Common Bathtub Parts to Keep in Your Home

The bathtub can be a great source of relaxation, and the easiest way to clean dirty kids or pets, but it does have parts that will eventually need replaced. To prevent this happening at an untimely moment, as these things tend to do, we’ve created a list of some parts you may want to keep on the shelf in the basement. Most of these parts are inexpensive and easy to find at your local hardware store. The majority of bathtub repair jobs are easily handled by the homeowner with no need to call in a professional plumber.
Handles – turning the water on and off is highly repetitive and will eventually cause the components within the handles to wear out. Handles can also be something that makes your bathroom look dated as time goes by. A simple upgrade here can make the whole bathroom look 20 years newer. Whether you have a single handle or two separate ones for hot and cold water you should have no trouble finding these at the store.
Rubber Washers – sometimes called O-rings are an absolute must to have on-hand. They’re interchangeable with your bathtub as well as your kitchen and bathroom sinks, and are incredibly cheap. The rubber washer will deteriorate over time and need to be replaced. If you notice components that appear loose or are not sealing properly, the rubber washer is likely the problem. While O-rings come in a few different sizes they’re so cheap that we recommend keeping a variety of sizes on-hand. The most common types of washers to keep around are seat washers, bonnet washers, and packing washers.
Face Plate – your bathtub likely has either a lever with a faceplate, or a faceplate for water overflow. In either case changing it out is pretty simple with just the removal of a few screws required. This is another easy way to upgrade the look of your bathroom.
Spout – the spout in your tub is the final cosmetic piece that you would need to replace to complete your visual upgrade. Before purchasing your replacement spout take a quick look at what you’ve got. If you see a small screw on the underside of your existing spout than you have a slip-on style. Otherwise you’ve got a threaded style. If you see water dripping from the spout it’s definitely time to replace it.
Drain Kit – having a functional drain is as important as a functional spout. The water has to be able to both fill the tub, and leave the tub smoothly. These are also one of the easier components to replace and will likely need done about the same time as the handles and spout. You may want to choose a style that fits your needs – certain kinds work better for homes with a high volume of long hair for example.
While this is certainly not an exhaustive list, other items such as gaskets, nuts, and screws are great to have available as well but this is a fantastic starting point. If you run into any trouble or find something unexpected, feel free to call All Star Plumbing and Restoration for assistance.
PVC Hose Caddy
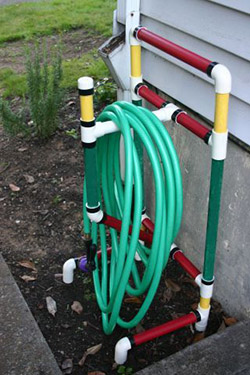
As you begin working on that fall checklist you’ll need somewhere to store your hoses this winter. Take a look at this clever design using PVC piping to create a colorful hose caddy.
Supplies:
¾” Sch. 40 90 degree elbow (qty 6)
¾” Sch. 40 PVC Pipe 5’ section (qty 3)
¾” Sch. 40 Tee Fitting (qty 6)
¾” Sch. 40 Cap Fitting (qty 3)
¾” Sch. 40 45 degree elbow (qty 1)
Washers (qty 4)
PVC Cement
½” steel rod 22” long
Snap Caps (qty 2)
Hammer
Power Drill
Measuring Tape
PVC Pipe Cutting Tool
Step 1: Cut PVC Pipe
You’ll need a variety of sizes for this project so begin by cutting the correct lengths.
20” (qty 2)
15 ¼” (qty 1)
14 ½” (qty 1)
11” (qty 2)
9 ½” (qty 2)
7” (qty 4)
6” (qty 2)
4” (qty 1)
3 ½” (qty 2)
2” (qty 2)
Step 2: Assembly
Start with the base. The feet require connecting one elbow to a cap with a 2” piece of pipe. Next attach one of your 11” pieces to the other side of the elbow. Repeat this entire process to create other foot. Put another elbow on the end of each of these to begin the vertical portion of the stand.
Next connect a 3 ½” piece to each elbow and then a t-fitting. Place a 20” piece of pipe vertically up the t-fitting and a 7” piece out the horizontal side. At the top of the 20” piece place another t-fitting then connect a 6” pipe vertically and a 7” pipe horizontally. At the top of the 6” piece put an elbow. Do this entire process again to create the other side of the frame. Connect the two top elbows using your 15 ¼” piece of pipe. Place a t-fitting in both places where 2 7” pieces of pipe come together.
On the upper t-fitting add a 9 ½” pipe and then another t-fitting. Place a 4” pipe vertically and a cap. Then place a 9 ½” pipe and a 45 degree elbow out the bottom of the t-fitting. Finally connect the 45 degree elbow with the remaining opening on the lower t-fitting by using your final 14 ½” piece of pipe.
Step 3: Glue
While PVC fits together nicely you’ll want to use your PVC cement to secure it in order to ensure it holds together when being pulled along. This is a quick and easy process.
Step 4: Wheels
To add wheels, drill a ½” hole in the bottom elbows and place your 22” metal rod. On the outside of the elbow add a washer to the metal rod then the wheel, and finally another washer. Next hammer a snap cap to the very end to keep the whole assembly together.
Step 5: Paint
If you wish to paint your caddy now is the time. Decorate however you see fit and your caddy is ready for use.
Past Plumbing Newsletters