


Leaky Toilet Temporary Fixes
As the holiday season approaches you know that’s the perfect time for a home repair emergency. If you find yourself dealing with a leaking toilet, and need to buy some time to get to Dec 26th, we’ve got you covered. There are generally 3 types of emergencies you can be faced with when it comes to your toilet. Either you have no water, the water won’t drain, or the water won’t stop running. The one that is considered the most serious is the situation where the water won’t stop running. This could mean you’ve got a leak, which can become a major problem pretty quickly and can create a whole different type of post-holiday debt.
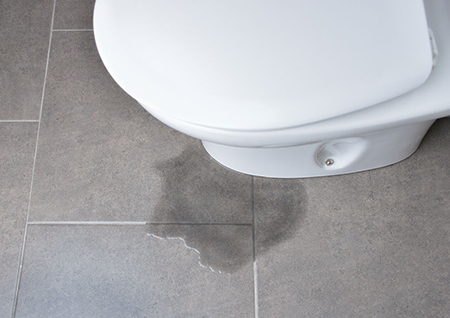
Step 1: Locate the Leak
You can’t fix it if you can’t find it. The easiest home testing tool – food coloring. Put a small amount of food coloring in the tank and flush the toilet. Now look around for where you see the coloring. Check the base of the toilet, between the tank and the bowl, and where the water line enters the tank. Once you’ve found the source you can start on the solution.
Step 2: You got Lucky
If you’ve determined that the leak is occurring where the line enters the toilet or where the tank meets the bowl, you got lucky. Most likely you simply need a new gasket or line and the problem will be handled. If replacing those is not in your Christmas morning plans, or if you would prefer All Star Plumbing come in for this, you can get by with a temporary fix. Turn off the incoming water line to the toilet, fill a 1 gallon bucket or milk jug with water and dump it into the tank. You may need to do that twice to reach the capacity for your toilet tank as they generally need 1.6 gal/flush. Once your tank is filled you should have enough pressure to be able to flush it. You’ll have to go through this process every time you use the restroom in order to flush, but you’ll get through a day or two. If the leak is between the tank and the bowl there may still be a small amount that comes out during each flush, just place a towel underneath.
If your leak is coming from the base of the toilet you likely need a new wax ring to seal the area better. This is very common, but not something to tackle on turkey day. You may be able to get by for the day by simply tightening the t-bolts at the base of the toilet. In many cases that will take care of it as a short term fix.
Step 3: You’re less Lucky
If the problem with your toilet is a continuous running, you’re not quite as lucky. There are fewer options for a temporary fix in this situation. Luckily a running toilet with no leaking isn’t going to cause serious damage to your home, but it will run your water bill up and can be incredibly annoying.
In most cases the running is caused by the float not rising enough to shut off the flow or the valve not closing fully. You can check that nothing is blocking the stopper from closing and wipe the area with a rag but if that doesn’t work you’ll have to resort to the bucket filling process if you want to stop the running. If the float is the problem, and it has a metal arm, you can try gently bending the float arm downward to shut the water off before it reaches the overflow.
Hopefully, these simple tricks can get you through any leaky holiday events. All Star Plumbing and Restoration is here for your plumbing emergencies even on the holidays though so if you need us just give us a call.
Ready to buy a home? Have you checked the plumbing?

You’ve been searching for what seems like forever. You finally found your dream home. All that’s left to do is move in, right? Maybe not so fast. While you certainly want to find that perfect place to call home, you don’t want to discover a few months later that your dream home is more of a nightmare. While it’s highly recommended that you get every aspect of your home inspected by a professional there is actually quite a bit of self-inspection you can do on the plumbing.
Given that the plumbing in your home is one of the most critical systems, and potentially one of the most expensive if something goes wrong, it’s worth taking the time to poke around a bit. Schedule a time to meet the real estate agent or homeowner at the property and do your due diligence. Unless they’ve got something to hide no one will begrudge you taking this time before such a large investment. Wear clothes you can get dirty and bring a good flashlight and you’re ready to start.
Suggested Inspection Steps:
- Shut off valve – locate the main shut off valve to the home and turn it to the off position. Then open several faucets and confirm that no water is moving through the house. If you find water still coming out of faucets than you have an issue that needs to be addressed.
- Pipe Sizing – take a look at the size of the pipes running throughout the home. Lines coming off the main should be ¾” to 1” in diameter, while pipes running to sinks and showers should be at least ½” in diameter. Anything smaller than that is going to result in low water pressure throughout the home. You can either ask the homeowner to address it as part of the sale, accept that you will have low water pressure, or handle the replacing of the pipes yourself down the road.
- Winterize – most likely this has already been handled, especially for a vacant home but confirm that the plumbing is prepared for freezing temperatures. This includes pipes being wrapped, vents that can be closed as needed, and for homes on well water the well should be protected too.
- Water Heater – this is one that can be an unwelcome, unplanned, big expense. Check the age of the water heater. The average lifespan of a hot water heater is only 8-12 years. If the hot water tank is nearing the end of its life, or shows obvious signs of corrosion, insist that the seller replace it. If it looks to be newer, confirm that the size is adequate for your family’s needs. A single person does not require the amount of hot water that a family of 6 does.
- Bathrooms – check that all toilets flush and refill properly. Run all of the faucets and check for any leaks, this may require you to move things in the area under the sink to allow access to the faucet’s plumbing. Run the shower that is the furthest from the home’s water source. This will be your best provider of information about water pressure and temperature available throughout the home.
There are a few other items you may need to get checked out. If the home is on a septic tank that should get its own inspection. In addition, if the home has well water that needs to be checked too. Finally, you should get confirmation from the seller that there are no lead pipes in the home.
If you would prefer a more complete plumbing inspection, contact All Star Plumbing and Restoration. We would be happy to come out and do a full plumbing inspection of your new home for you.
Carpet Upgrade

Replacing your carpet is one of the easiest and most rewarding upgrades to your home. You spend so much time, especially right now, walking around inside your home that the feeling of new, soft carpet under your feet is worth the time and money spent. If your home has suffered from damage such as water, mold or fire, All Star Plumbing and Restoration can handle it all, including removing unsalvageable carpet. In other cases, the damage has come from a beloved puppy or toddler, we’re still here to help. It’s not an easy to task to remove and dispose of old carpeting, and in many situations you’re not exactly sure what you’ll find underneath. Let us make sure that your carpet upgrade runs smoothly and your floors are fully prepared for the new carpeting to arrive.
If new carpet simply isn’t in the budget, we get it. That doesn’t mean you can’t enjoy the beautiful look and feel of well-maintained flooring. Here are some simple suggestions for increasing the lifespan of your carpeting.
The best thing you can do is protect the carpeting from as much damage as possible. To prevent dirt and mud from tracking into the home, try placing shoe bins by the door to encourage everyone to take their shoes off before heading in. In addition, well placed floor mats at the entrance to carpeted rooms can also help grab onto all of those outside particles – dirt, gravel, asphalt, and more. It can be contained to an easy to clean, cheaper to replace floor mat rather than your carpet. You may also need to wipe off pup’s feet when returning from your morning walk. In many cases pets bring a tremendous amount of the dirt and mud into your home.
Regular cleaning is another key to long carpet life. Vacuuming is essential. Beyond that though is the regular use of a carpet scrubber. Whether you own one or rent one it’s worth the investment to really deep clean carpets at least once a year. It’s a big project but take the time to move furniture and really clean the entire area. High traffic areas should be done more frequently, like every few months, to prevent dirt from getting deep into the fibers. We also recommend applying a carpet protector after cleaning. It protects the carpet, keeps it clean longer and increases the overall lifespan.
One final suggestion is to deal with stains immediately. When something hits the floor you’ve got to jump right on it. Remove the spilled item asap, blot the area with a clean rag and then use the appropriate cleaning product to get down deeper in the carpet and lift the stain out. After any visible staining has been removed apply water, lay down a towel, and place a heavy object on top to pull out any stains still hidden underneath.
With regular cleaning and protection your carpeting will look amazing for years to come, but when the time eventually hits for replacement, give All Star Plumbing and Restoration a call. We’ll get it out and hauled away in no time.
Fall Corn Dip

Looking for something tasty to dip into during the next football game? Try this incredible corn dip. Add seasonal veggies to make it your own and serve either cold or warm.
1 c. sour cream
½ c mayonnaise
½ tsp garlic salt
½ tsp pepper
2 c. shredded cheddar cheese
1 can corn, drained
1 can Mexicorn, drained
10 oz can Rotel, drained (or 1 fresh tomato chopped and seeded)
4 oz can diced green chiles, drained,
¼ c chopped yellow and/or orange peppers
4 oz can sliced olives, drained
¼ c. chopped green onions
¼ c chopped cilantro
Tortilla chips, pita chips, fresh veggies, crackers – for dipping
Use hand mixer to combine sour cream, mayonnaise, garlic salt and pepper. Stir in shredded cheese and all other vegetables. Top with cilantro and serve.
Past Plumbing Newsletters